Showing posts with label Valentine's Day. Show all posts

Saturday, February 7, 2015

Color By Number Valentine's Poster


Last year we made some giant coloring posters to bring to a class Valentine's party and had so much fun doing it that we decided to do it again this year!


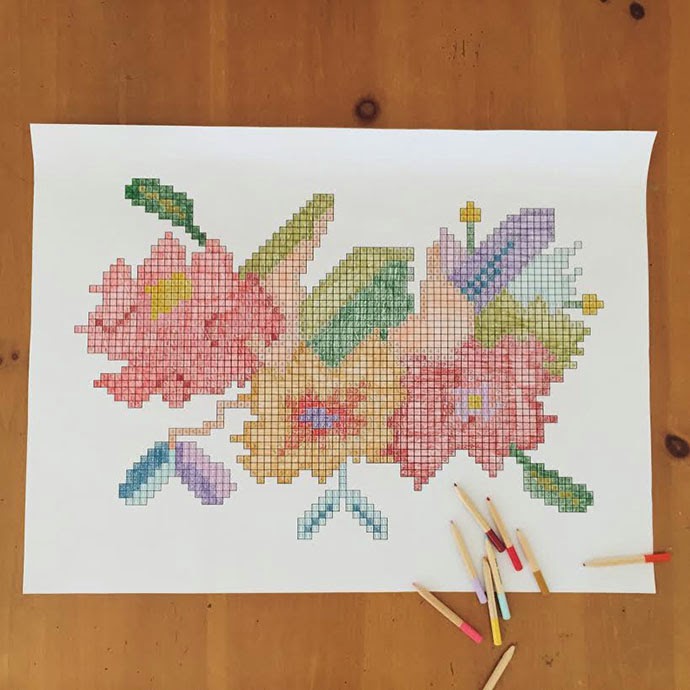
I saw a kilim rug recently featuring a fantastic pixel-y floral design. I spent the last few nights making the image above, and then thought it would make for the perfect color by number page or poster for kids (and adults too!)

So I removed the color added numbers in and had it printed at my local Staples for only $1.99 (this is an 18x24 size-bigger sizes available too).


I colored one as an example and it reminded me of buying those velvet posters and coloring them as a kid back in the '90's, remember those? If I could find a way to add some fuzzy black velvet to this guy, I totally would.


We plan to give a letter-sized version away as valentine's with a little bundle of colored pencils and a color guide at school this week! I also made a folded card out of the original colored design to use for other friends and family.

If you would like to make one of you own, here you go (click on links below to download):

-Color by Number Valentine Coloring Sheet*
-Color Guide
-Pixel Flowers Valentine's Card

*This is in a standard letter size to be printed at home, or you can go to the Staples website and select "Engineer Prints" and upload this file to be printed in multiple large sizes starting at $1.99. I was able to order mine online and pick it up a few hours later.

Also, a note on coloring...the larger areas to be colored have a numbered border around them and everything within that border is meant to be that color. Color the border first and it will be clear what goes inside it :)

Tuesday, February 11, 2014

Whip Up Wednesday: Wax + Ink Valentines


Now that the kids are settled with their classroom valentines, it's time to make something for my Love. This year marks our 12th Valentine's Day together and I have Paula Abdul to thank for giving me the perfect words to say. I am forever and always his girl.

I've been playing around with wax and ink and decided to make a little card for J. Did you know wax and ink naturally resist each other? You can use a white crayon over ink much like chalk on a chalkboard and I love the effect!


To make your own card, gather:

heavy paper
india ink
a paintbrush and small vessel for ink
a white crayon
a pencil

First, draw a faint outline of your design-be it letters, a heart, or anything else you dream up. Next, fill in your design with the white crayon, pressing as hard as you can and going over the area a few times. Paint ink over the top of your design and let it dry completely. As your paper dries, you will see the wax slowly come through. For a subtle design, leave as is. I wanted my design to be more bold, so once the ink completely dried, I went back over my design with more white crayon, which made a huge difference!


Do you have anything special planned this week?

Sunday, February 9, 2014

Valentine's Day Coloring Poster (A free download)


I should preface this by saying I am by no means a fancy illustrator (also, those are some white legs!), but I do love to doodle. I especially love to doodle with a big old brush pen. My children will often ask me to draw something of their choice that they can color. I love how open minded children are about all levels of art! They always say, "our Mom can draw anything (not true)!" While coming up with a craft for my daughter's class Valentine's Day party, I thought why not make a bunch of doodles into a giant poster?!


I got a little stuck when it came to a Valentine's theme. So, we decided to add in some doodles of sweets, a hot air balloon, and a bear. I printed an extra one for my girls to color throughout the week and taped it to the wall. They have been in coloring heaven, and the whole thing was finished within a few days.


So, how do you print this giant thing? The process is SO easy and the price per poster rang in just over $3.50. All you need to do is download the file here, save to a disc or jump drive, and take it to your local print shop. Ask them to print it on their blueprint printer/paper. The actual size of the file/poster is 24"x36".

We ordered ours from Staples, which was extra easy thanks to their online system. We uploaded our design, paid for it, and then picked it up at the shop an hour later-so easy. If there's a staples near you, follow this link to their online processing.

Happy coloring!

Thursday, February 6, 2014

Eraser Valentines for your little Sweetheart


As promised, here is another simple idea for class valentines. I recently stumbled upon a section of adorable Japanese erasers at our local toy shop. They were too cute to resist, and since my little Kindergartener and her friends are learning to write, I knew they would perfect. These little cherries are my favorite and come in six fun colors (you can also find Japanese cherry erasers here). The fruit comes off the stem for easy erasing.


I made another simple template and laid the cherries on top before punching two holes with a small hole punch near each side of the cherry stem. I used a little bit of black thread to tie the eraser to the card and had my daughter sign her name. I had some stripey waxed paper lying around that I ended up making little envelopes from (there are only ten kids in her class!).

The thing I love about this Valentine is that you can use any cute eraser you can find. I'm partial to the Japanese ones, such as these zoo animals, or these vehicle and plane erasers. You could also search your local craft store for other fun options.

Click here to download the eraser Valentine template.

Happy Valentine making!

Wednesday, February 5, 2014

Whip Up Wednesday: Butterfly Valentines


Ah, Valentine's Day. Can you believe it's only a little over a week away? I thought I would dedicate this week's whip up Wednesday to the making of simple class Valentines.

This year we have two bundles of cards to bring to school, so I turned once again to the trinket/dime toy section of the toy store-because they are already going to be hyped on sugar and a cute card with a toy beats a character card every time! The party favor section is also a great place to look for hidden treasures.


While searching the bins of toys, these little butterflies jumped out at me. They have Addie written all over them, and at $0.10 a pop I had not choice but to snatch them up (find pretty Plastic Butterflies similar to mine for yourself). I printed a little card and attached the butterflies with a little piece of double stick tape. I made the dotty envelopes by stamping them with a pencil eraser and a black ink pad.


I am definitely not the first to go this route with class Valentines. If you're looking for more inspiration, be sure to check out Danyelle's archives-she is the QUEEN of simple and adorable cards!

Feel free to download my template here.

Stay tuned for part two...

Wednesday, January 29, 2014

Whip Up Wednesday: Customized Envelopes


I spent all of last week being inspired and mingling with amazing people at Alt. More on that later! I missed out on Whip Up Wednesday last week, so I wanted to make this week extra special.

Have you ever made your own envelopes? A pretty patterned envelope pairs perfectly with a simple card and can be customized in so many ways!


For a fully customized envelope, start with a sheet of watercolor paper (9"x12") and painting supplies. Paint a pattern, scene, or color wash and then let it dry. I decided to make a simple pattern with different shades of the same poppy orange-red color (inspired by my favorite lipstick!). Once my paint dried, I filled in the details of the flower with a fine art pen.


Take an unused envelope and gently pull it apart. Once your watercolor has dried, lay envelope on top and trace. Cut out your envelope and flip over so the blank side is facing up. You can also find ready made envelope templates in various sizes here.


Fold sides of envelope in and put a small piece of double sided tape along the bottom. Fold up the bottom of the envelope, securing it with the tape.


Fold down the top of your envelope and you're done! If you don't feel comfortable with painting, you can also use this technique with wrapping paper, old calendars, and pieces of art made by your children. I plan on popping some heart shaped cards into these bad boys and sending them out this Valentine's Day!